Project
Introduction
The
project was set up to make mounts for objects in drawer C1A in Material Culture
Room (MCR) of the UCL Department of Anthropology, which houses the Ethnography
Collections. The drawer was in the top level of a closed cabinet, where the environment
was considered to be stable. However, as shown in Figure 1, there are 2 albums, 2 baskets and their accessories placed directly on the Plastazote® foam in
the drawer, which allowed sliding and knocking over when the drawer was opened or
closed. Fibre fragments could be seen trapped on the Plastazote®. What’s worse, due
to limited space, some parts of the objects overlapped each other, which could
cause abrasion and scratches.
The working process is listed as follows (Figure 2). First, the general planning of the drawer including investigation, measurement and template making were done. Then the specific designs for the mounts. Finally, after all the practical work was done, some conclusions were made on the finished product.
Description
Drawer C1A was located on the top of cabinet C1 in MCR (Figure 3). The environment condition in MCR is fluctuating. The temperature and RH changed with time and location according to the indicators. But as the drawer was in a closed cabinet, it was supposed to be more stable than the ambient environment.
 |
|
Figure 1. Drawer C1A before treatment.
Photo taken by author.
|
For better preservation,
suitable mounts were needed. The key objectives were:
- Relocate objects for optimal use of the space available and reasonable distribution of gravity for better handling (Baldursdóttir 2007, 5);
- Create non-harmful, protective mounts to improve the storage;
- Allow objects to be handled and transported safely (Battisson 1999, 13). Since the objects belong to teaching collections, handling is an important concern;
- Preserve the fibre fragments trapped in the drawer.
The working process is listed as follows (Figure 2). First, the general planning of the drawer including investigation, measurement and template making were done. Then the specific designs for the mounts. Finally, after all the practical work was done, some conclusions were made on the finished product.
 |
| Figure 2. Flow chart of the working process of the mount-making project. Drew by author. |
1. Relocation: Planning of the Drawer
 |
|
Figure 3 (Left). The drawer before
relocation and mount-making.
Figure 4 (Right). The drawer after the
project. Front of the drawer faced down in both photos. Photos taken by author.
|
Description
Drawer C1A was located on the top of cabinet C1 in MCR (Figure 3). The environment condition in MCR is fluctuating. The temperature and RH changed with time and location according to the indicators. But as the drawer was in a closed cabinet, it was supposed to be more stable than the ambient environment.
Preparation
Before the design of the mounts, I needed to learn the objects’ basic
information such as dimensions, materials and conditions. There were 12
pieces of objects in the drawer (see details in Table 1). Photography was carried out for documentation. To better
understand the objects, a digital 3D model was made to discuss the design for
mounts (Figure 7a).
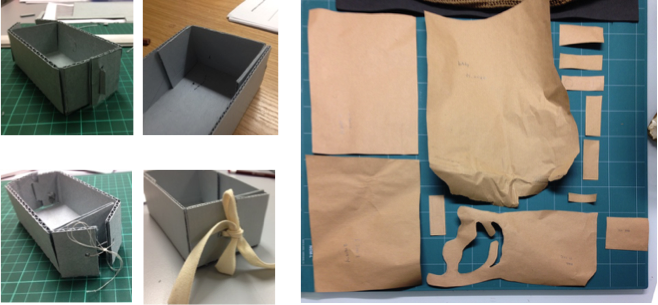
Templates of objects were cut before deciding on the design. The templates were used during the mount-making process instead of real objects, so as to avoid handling as much as possible. To save materials, the templates were cut from the wrapping paper of Correx® (Figure 5). 2 templates of boxes were made to familiarize the hand tools using archival corrugated boards. As depicted in Figure 6, different kinds of bindings were experimented, including joint, glued, thread and cotton tape - cotton tape was the most efficient one.
 |
|
Table 1. The information about the
objects in drawer C1A. Measurements are taken using rulers. All the photos were
taken by author. The accession number, material culture and designation are
acknowledged by MCR.
|
 |
|
Figure 5 (Right). The templates of objects were cut from wrapping paper.
Figure 6 (Left). The templates of boxes
with different binding. Photos taken by author.
|
Mount
Design
The first step is to relocate the
objects. As shown in Figure 7b, the space is quite limited however the objects
located. So the idea came that the height of the drawer should be used, which
means the baskets could be housed respectively in two shallow layers (Figure 7c).
However, in the practical session, the uneven gravity distribution, namely the
heavy albums in the front, while the light baskets in the back, makes it
difficult for people to pull with arms outstretched. Hence the plan was
adjusted for safe handling (Figure 7d). The next consideration is the forms of
the mounts. For the albums that pages are loose and sliding off, boxes with
high side-walls are needed. As for the baskets, a double-layered tray could fit
the job.
 |
|
Figure 7. The different planning of
relocation of the drawer. a. The drawer before treatment, where objects
overlapped each other. b. One possible way to locate all objects in a layer,
with no margins for mounts. c. The plan of using double-layered tray for saving
space. d. Change the location of the albums and the baskets to better
distribute weight. Painted by author.
|
For materials from which the mounts will
be made, elements to consider include their physical properties, stability,
damage to other materials and economical and environmental effect. For the
boxes and trays, the material used should provide sufficient strength to carry
the load and will not depress (Barclay 1998, 26). It should be stable,
non-harmful and durable, but does not need to be strictly buffered because of
the stable environment. It should not cost much for MCR has limited funding and
resources but lots of objects. Also, as they are teaching collections, they don’t
need so much control. The materials available in MCR that fit all the requirements
are the buffered boxboards and Correx®. Considering the sizes and weights,
boxboards are chosen. Buffered boxboards are acid-free synthetic boards
(Lindsay 2000, 94). The one used in MCR have blue paper stuck to the white laminate.
As white side is lignin-free and prevents colour transfer, so is used as
interior. The padding material used is Plastazote®, which is cross-linked
polyethylene foam (Barclay 1998, 16). It can be easily cut and adhered with
hot-melted glue. For different needs, foams of different thickness and
densities could be used. The thin foam sheets (0.3cm) are soft and floppy,
which could cushion the collision between objects and mounts, while the thick
ones (0.6cm) are smoother and rigider, which should be used as base material. Due
to limited amount of foam sheets, the boxes and tray might use Plastazote® of
different colours respectively, but the colours within a mount should be consistent.
Time
& Cost
It took 1 hour for measurement, 1 hour to
make templates of objects, 2 hour to make templates of boxes and try different
bindings. The 3D-model-making and planning took about 3 hours in total. The template–making
took more time than expected, since the unfamiliarity of materials and tools.
The 3D models helped save time on planning. Materials used are listed below:
- Archival Corrugated boards, 20cm x 15cm x 0.3cm, 2 pieces, about £1. The templates were cut from used pieces.
- Cotton tape, 30cm.
- Hot-melted glue.
- Thread
- Wrapping paper
All the prices in the project refer to
website of Preservation Equipment Ltd, from which the materials were bought, as
consulted with the MCR staff.
Design: Boxes for Albums
 |
|
Figure 8. Left top: The album on the unpacked mount. Left bottom: Album
Z0001a packed in the mount. Right: Album Z0001b packed in the mount. Photos taken by author. |
Description
The paper page photo albums were
in good condition, except the loose pages. As the two albums are of similar
forms, they share the same mounts design.
Mount
Design
As shown in Figure 8, the
mount was designed to be boxes, the side-walls of which can protect objects
from sliding (Aboe 2012, 105). Plastazote® strips were adhered to edges of the
box floors to stabilize the albums, with finger-holes to encourage careful
handling from where it is safer. The inner sides of the boxes were padded with Plastazote®
foam to decrease shock abrasion when the drawer is opened or closed (Aboe 2012,
105).
For the construction of the
boxes, the first idea was to build boxes where the albums can be directly
picked up (Figure 9a). But the disadvantage is that people cannot see the whole
album while handling. Then the idea came that the boxes should be one that could
be fully unpacked (Figure 9b). The sides are held in place by the lid and will
drop open when the lid is lifted. However, as the object is housed in cabinet,
which means limited access of dirt, a lid is not essential. So it came the
final design that the side-walls are bound during storage and transport. When
handling is needed, the tape could be untightened, allowing the walls to drop
down.
Procedure
- Used template to determine the size of the box, leaving a margin of about 1.5cm.
- Drew the diagram on the buffered boxboards.
- Cut with a ruler and a snap-off knife on cutting mat (Figure 10a).
- Scored outside of folds and creased boards to achieve a neat result (Couch and Turbucz 1983, 93).
- Drew the diagrams on Plastazote® and cut with a scalpel.
- Glued the Plastazote® in position with glue gun (Figure 10b). Clamps were used to stabilize the binding, with thin foams in between as buffering.
- Used a scalpel to cut the holes in the flaps. Folded the box (Figure 10c). Drew the cotton tape through the holes and tied up. Cut the tape to suitable length and made knots at both ends to avoid the tape being pulled out (Figure 10d).
Time
& Cost
It took 3 hours to finish the
first album. As the procedures are the same, the second one took less time,
about 2 hours. Materials used are:
- Buffered boxboards: 50.8cm x 40.6cm x 0.15cm, 2 new pieces, about £3.4. The diagrams were cut from a brand new sheet. To minimize waste, it was cut along the edges, which leaves 2 strips.
- Cotton tape, 50cm long, 4 pieces, about £1.
- Hot-melted glue.
- White Plastazote® foams; 25cm x 21cm x 0.3cm, 2 piece; 25cm x 3.2cm x 0.6cm, 2 piece, about £0.2. The thin Plastazote® were cut from a new sheet from edges, leaving rectangular foam about the size of 50cm x 20cm and several thin strips. The thick strips were cut from the edges of used pieces without producing waste.
 |
|
Figure
9. The prototypes of boxes for albums. a. The box which allows directly
handling. b. The box that could be fully opened. The flaps are in position when
the lid is covered. When the lid is lifted, the flaps will drop down. Painted
by author.
|
 |
|
Figure
10. The procedure of making boxes for albums. a. Cut the boxboard according to
the diagram. b. Glued the shaped Plastazote® to the box. c. Fold the folds as
the order shown. d. Tie with the cotton tape. Painted by author.
|
Design: Double-Layered
Tray for Bags
 |
|
Figure
11(Top). The lower layer of the double-layered tray.
Figure
12 (Bottom). The upper layer of the double-layered tray.
Photos taken by author.
|
Description
The basket with strap
(H0001) was in good condition. The strap seemed to have inelastic deformation.
There were 5 slices and a plastic bag accessorized to it. The woven grass bag (H00060)
was in poor condition. The fibres were fragile, with lots of fragments left in
the drawer. There was a tube of its fibres in the drawer.
Mount Design
As mentioned above, the
2 baskets were designed to be stored in a double-layered tray. The upper tray
with smaller platform will rest above the lower tray, the side-walls of which
stand outside. Plastazote® planks were shaped at corners to support the upper
platform (Aboe 2012, 105). For the planning of the two layers, the heavier
pieces should be positioned in the bottom, which are the slices and basket
H0001, while the light H0060 with the tube lie on top.
The lower layer was compartmentalized
by a dividing wall (Aboe 2012, 107). One part stored the slices. A thick Plastazote®
sheet is used as basement and a thin sheet with cutouts of slices and
finger-holes was glued on top to prevent sliding. The other part housed the
basket H0001. First, the consideration was to have a thick Plastazote® sheet with
cutout following the contour of the basket. But worry was raised that the
cutout may be in conflict with the strap’s original intended position (Barclay
1998, 7). Then the idea came that the basket should rest on the basement wrapped
by smooth materials, such as Tyvek®. But it turned out that the thick, smooth Plastazote®
sheet could hold the baskets in place without catching fibres or scratching
surfaces (Aboe 2012, 103). Hence the final design is that the basket could be
directly stored on the fine Plastazote® sheet. For the upper layer, the tray
floor was cut smaller than the one of lower tray, with finger-holes for
lifting. Flaps on the long sides were added for stability. Same as basket
H0001, decision was made that basket H0060 could be stored directly on smooth Plastazote®
foam. The tube that contains the fibres of the basket were sandwiched by 2 Plastazote®
strips to protect it from rolling. Disarticulated fibres were all collected to
a plastic bag. When all mounts were done, labels were attached to identify
objects and ensure the objects could be returned to the right place after
handling (Aboe 2012, 103). In this case, the labels are adhered to the outside
of the tray on the 2 short ends.
Procedure
- Used template to determine the size of the whole tray, leaving margins between objects and walls (Figure 13a).
- Drew the diagram of the lower tray and cut it. Scored outside of folds and creased the folds.
- Assembled the tray (Figure 13b). Glued the corners in position and clamped until stabilized.
- Cut the thin Plastazote® sheet (0.2cm) to 24cm x 10cm. Drew the diagrams of slices on it and cut with a scalpel. Finger-holes were left on both sides of the cut-outs. Cut a thick sheet (0.5cm) of the same size, and glued it beneath the thin layer. Pressed the foam for better adhesion. Then glued the whole piece to the tray (Figure 13c).
- Cut a strip of boxboard as a dividing wall. Folded and glued it to the lower tray.
- Cut the thick Plastazote® to fit the rest part of the lower tray. Glued it (Figure 13c).
- Shape Plastazote® planks to legs of proper height. Glued them to the corners to support the upper tray (Figure 13d).
- Drew the diagram of the upper tray. The platform was smaller than the one of lower tray. Double-checked that the upper tray could fit in the lower side-walls (Figure 13e).
- Cut the boxboard and the finger-holes on the short ends. Scored outside of folds and creased the tray (Figure 13f).
- Cut the thick Plastazote® foam to fully cover the tray floor (Figure 13g).
- Two strips were cut to stable the tube from rolling (Figure 13h).
- Placed the upper tray on the lower one to see if the supports worked. And adjust the upper floor so it could fit the lower tray.
- Make labels with photos. Attached by double-sided tape on the outside of both ends of the tray.
Time & Cost
It took about 3 hour
to finish the lower tray and 1 more for the upper one. To cut the curve
finger-holes took much more time than expected. Materials used are:
- Buffered boxboards: 50.8cm x 40.6cm x 0.15cm, 2 new piece, about £3.4. The diagrams were cut from a brand new sheet from the edges, leaving strips that were used as dividing wall in the mount.
- Black Plastazote® foams; 24cm x 10cm x 0.3cm, 1 piece; 42cm x 24cm x 0.6cm, 2 piece, about £1 in total. The thin sheet was cut from a L-shaped left. The thick sheet was cut from a large piece about 50cm length and 50 cm width. The leftovers were some strips, which were used as legs in the mounts.
- Double-sided tape.
- Hot-melted glue.
- Transparent pressure-sealed plastic bag, 1 piece.
 |
|
Figure
13. The steps of making the double-layered tray. a. The diagram of the lower
tray. b. Fold the tray as directed. c. Prepare Plastazote® sheet cutouts. d.
Assemble the tray, use Plastazote® legs for supporting the upper layer. e. The
diagram of the upper tray. f. Fold the flaps as shown. g. Add Plastazote®
layer. h. Glued strips for tube.
|
Conclusion
For safe storage and
handling, objects need unique mounts designed according to their shapes,
materials and conditions. The portfolio describes the mount-making project of a
drawer, which holds objects of different properties. It presents the consideration
and design during mount-making, and demonstrates the practical abilities. The
project took in total 15 hours to finish the practical session of the project. The
time consumed is 3 hours more than expected. The most time-consuming
part is to draw the diagrams and cut the buffered boards. The former one took
time because it always went wrong, leaving no space for the thickness of
boards. The latter one needed repeated cutting since the boards are thick and
hard, and it was quite easy to cut off the lines. The final cost is about £10. The actual expenditure is actually cheaper than expected. One
reason is that the materials chosen are cheap. Also, most of the materials were
made best use of, leaving only small strips and fragments. No work is redone,
which means no large pieces were wasted. And all the materials used are
environmental friendly. The most challenging part of the project is to develop sufficient mounts to restore multi objects in limited space. Different designs have been discussed to save place. To finish the 3 complicated mounts in short time is another challenge. It needed extra carefulness in the practical session so that there was no waste of time.
The finial mounts
came as 2 boxes and a double-layered tray. The mounts are stable, durable and
cheap, allowing safe storage and handling, which are quite satisfying. The
special design of the boxes for albums allows both stable storage for loose
pages and safe handling without the need to touch the objects. The
double-layered tray helps save the space and also decreases the possible damage
that could be caused by handling. Things that could improve including the
cutting edges, which could be neater, and the margins left that should be
larger. If possible, a different form of the boxes for albums might be considered. According to further investigation, boxes with lids might be better so that they could protect the printed postcards and page leaves from the other materials in the drawer. Also, the current design does not have clear indication of the objects' information. If the project could be done differently, space for labels should be taken into consideration.
Bibliography
Aboe, G., 2012. Packaging and Storage Solutions for
Archaeological Basketry: a Selection of Practical Designs. Journal of the Institute of Conservation. London: Routledge, 35/1,
103-111.
Baldursdóttir, T., 2007. Storage of the Stein Loan
Collection. V & A Conservation Journal.
London: Victoria and Albert Museum, 55, 5-7.
Barclay, R. L., 1998. Mount-making
for Museum Objects. Ottawa: Canadian Conservation Institute.
Battisson, C., 1999. A Brief History of Mounts. V & A Conservation Journal. London:
Victoria and Albert Museum, 33, 13.
Preservation Equipment Ltd, 2016. Retrieved on 8 March 2016
from World Wide Web: http://www.preservationequipment.com
Couch, R. and Turbucz, M., 1983. Trays for Lining and
Partitioning Wooden Storage Drawers. Journal
of the American Institute for Conservation. Washington: Maney Publishing,
22/2, 92-97.
Lindsay, H., 2000. Protective
Packaging: An Introduction to the Materials Used to Produce Archival Quality
Boxes, Folders, Sleeves and Envelopes. Journal
of the Society of Archivists. London: Routledge, 21/1, 87-104.


